‘Microsoft Defender for Cloud’ (previously known as Azure Security Center and Azure Defender) is a tool that strengthen your Cloud Security Posture Management (CSPM) and Cloud Workload Protection (CWP). It protects your workload running in Azure, hybrid, or any other cloud platforms.
In this blogpost, we will mainly focus on Cloud Workload
Protection (CWP), which are typically agent-based workload-centric security
protection solutions along with below topics.
1.
Enable ‘Microsoft Defender for Cloud’ on
your subscriptions
2.
Enable Enhanced security features
3.
Workload Protection
a.
Dashboard coverage
b. Advanced protection
Enable
‘Microsoft Defender for Cloud’ on your subscriptions
1.
Sign into Azure portal
2. From the portal menu, Search and select ‘Microsoft Defender for Cloud’


To enable all ‘Microsoft
Defender for Cloud’ features including threat protection capabilities, we
need to enable enhanced security features on the subscription containing the
applicable workloads. Enabling it at just the log analytics workspace level,
doesn't enable just-in-time VM access, adaptive application controls, and
network detections for Azure resources.
In addition, Microsoft Defender
plans available at the workspace level is limited to only ‘Microsoft
Defender for Servers’ and ‘Microsoft Defender for SQL servers’ on
machines.
To enable enhanced security
features on your subscriptions and workspaces:
1. From Defender for Cloud's main
menu, select Environment settings.
2. Select the subscription or
workspace that you want to protect.
3. Select Enable all
Microsoft Defender for Cloud plans to upgrade.
4. Select Save.

Workload
Protections
Workload protections gives you the visibility into your different resource types. Based on that visibility, you can link your resources to configure advanced threat protection capabilities in ‘Microsoft Defender for Cloud’.
Dashboard
Coverage:
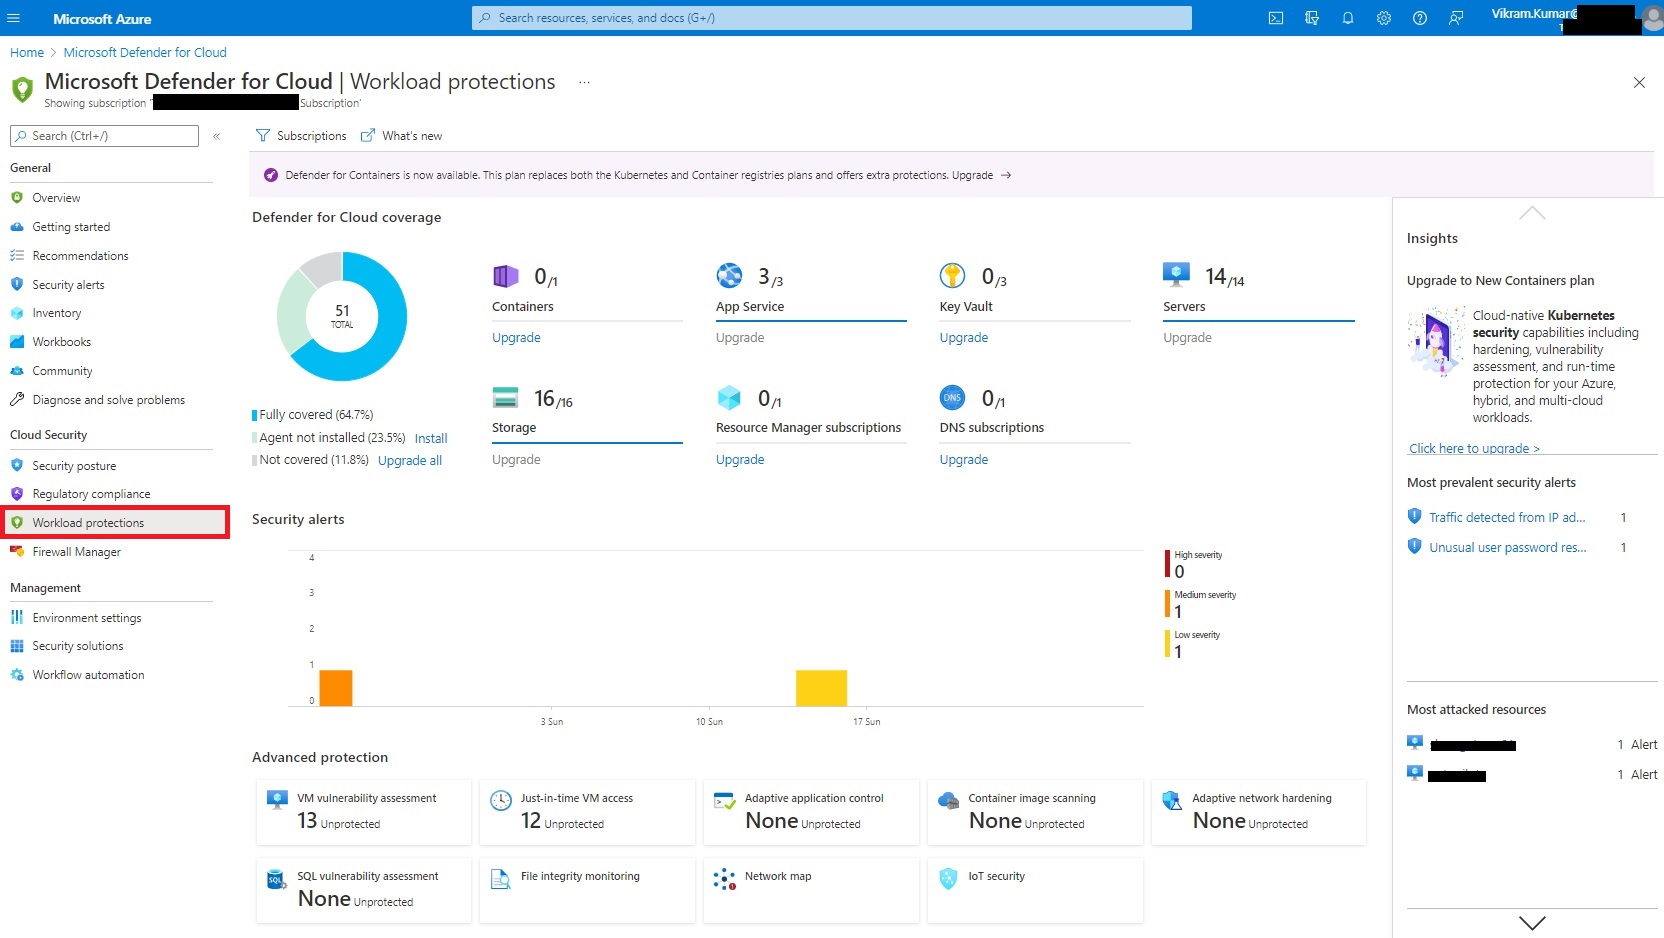
As shown
in above screenshot, Dashboard includes the following sections:
1.
Defender for Cloud coverage -
Here you can see the resource types that are in your subscription and eligible
for protection by Defender for Cloud. Wherever relevant, you'll have the option
to upgrade too. If you want to upgrade all possible eligible resources,
select Upgrade all.
2.
Security alerts -
When Defender for Cloud detects a threat in your environment, it generates an
alert. These alerts describe details of the affected resources, suggested
remediation steps, and in some cases an option to trigger a logic app in
response. Selecting anywhere in this graph opens the Security alerts
page.
3.
Advanced protection – This
section includes many advanced threat protection capabilities for virtual
machines, SQL databases, containers, web applications, your network, and more. You
can see the status of the resources in your selected subscriptions for each of
these protections.
4.
Insights - This
rolling pane of news, suggested reading, and high priority alerts gives
Defender for Cloud's insights into pressing security matters that are relevant
to you and your subscription.
Advanced
Protection:
Advanced Protection section helps
you deploy vulnerability solution on your VMs, enable Just-in Time access for
your VMs, Adaptive Application Control, Adaptive Network hardening, Container
Image Scanning, SQL vulnerability assessment, File Integrity monitoring,
Network map and IoT Security.
For this
blogpost, we will look to 3 protection options and rest will be covered in my
next blog.
1.
VM Vulnerability Assessment:
There are
several options for deploying a vulnerability assessment solution for Azure
VMs. With ‘Enable all Microsoft Defender for Cloud Plans’, you can
quickly deploy a vulnerability assessment solution powered by Qualys with no
additional configuration or extra costs. Qualys’s scanner is the leading tool
for identifying vulnerabilities in your Azure virtual machines. Once this
integration is enabled, Qualys continually assesses all the installed
applications on a virtual machine to find vulnerabilities and presents its
findings in the Microsoft Defender for Cloud console.


2.
Adaptive Application Control:
Adaptive application controls help to
harden your VMs against malware by making it easier to control which
applications can run on your Azure VMs. ‘Microsoft Defender for Cloud’
has built-in intelligence that allows you to apply rules based on machine learning.
This intelligence analyzes the processes that are running on your VMs, creates
a baseline of applications, and groups the virtual machines. From here,
recommendations are provided that allow you to automatically apply the
appropriate rules. The use of machine learning intelligence makes it super
simple to configure and maintain application.
Apply ‘adaptive application control’ contains
the following 3 recommendations:
·
Log
Analytics agent should be installed on your virtual machine
·
Adaptive
application controls for defining safe applications should be enabled on
your machines
· Allowlist rules in your adaptive application control policy should be updated

Application allowlist is not necessarily a new concept. One of the biggest challenges of dealing with the application allowlist is how to maintain that list. The traditional approach of using AppLocker in Windows is a good solution, but still has the overhead of keeping up with the applications and making the initial baseline work properly for our needs. Adaptive application controls is one of the advanced protection features you can benefit it from in ‘Microsoft Defender for Cloud’.
3.
Adaptive Network Hardening:
We use network security groups (NSG) to
filter traffic to and from the resources in Azure, it improves your network
security posture. However, there can still be some cases in which the actual
traffic flowing through the NSG is a subset of the NSG rules defined.
Adaptive network hardening provides
recommendations to further harden the NSG rules. It uses a machine learning
algorithm that factors in actual traffic, known trusted configuration, threat
intelligence, and other indicators of compromise, and then provides
recommendations to allow traffic only from specific IP/port tuples.
Example let's consider the existing NSG rule is to allow traffic from 10.xx.xx.10/22 on port 80.
Based on traffic analysis, adaptive network hardening might recommend narrowing the range to allow traffic from 10.xx.xx.10/29 and deny all other traffic to that port.

The Rules tab below shows the
recommended changes to the traffic rules for your network security groups.
Applying these recommendations will improve your network security posture and
harden your groups traffic rules.
The IP ranges listed in “Suggested allowed source IP ranges” are the
modifications that Defender for Cloud is recommending you make to your rules.
If a recommended rule change shows “Suggested allowed source IP ranges”
as “None”, it means that Defender for Cloud is recommending blocking all
traffic for that protocol to that port. That kind of rule is called a “deny-
all” rule.

This has been a rather long post to
outline few advanced protections features of ‘Microsoft Defender for Cloud’.
I’ll cover rest of the advanced protection features in my next blog.
Comments
Post a Comment