Background
Back in June 2018, Microsoft announced the general
availability of Disaster Recovery (DR) for Azure virtual machines using Azure
Site Recovery. Azure is the first public cloud provider to offer native DR
solution for application running on IaaS.
Along with Availability Zone and availability sets, ‘Azure Site Recovery’ provides
resiliency for applications running on Azure VMs.
This blog will cover the extensive points on disaster
recovery setup process for virtual machine hosted in Azure.
I’ve divided this article into several sub-sections for
disaster recovery:
- Prerequisites
- Create Recovery Services Vault
- Enable Replication
- Test Failover
- Failover, Commit & Re-Protect
Prerequisites:
- Azure subscription with permission to create ‘Recovery Services Vault’ and VMs in target region along with virtual network, storage account etc.
- Supported VM operating systems like Windows or Linux.
- Supported Azure regions for disaster recovery (DR)
- Outbound network connectivity for VM replication and latest root certificates
Create Recovery Services Vault:
Create a Recovery Services vault in any region,
except the source region to replicate. For this article, I’ll consider source as ‘East Asia’
region and will replicate VMs in target ‘Southeast Asia’ region.
1. Login to Azure portal and search & select ‘Recovery Services Vault’

2.
Fill out the details like ‘Resource Group’, ‘Vault Name’
and ‘Region’, then click Next

3.
Add ‘Tags’
(optional) in next page, then click Next

4.
Verify the details and click ‘Create’

5. Follow the progress under Notifications and move on to next section

Enable Replication
1.
Open Vault and go to settings, click Enable Site Recovery

2.
In Site recovery page, click on enable VM
replication by selecting ‘Enable
replication’

3. This will bring a new page called ‘Source’ to fill up the details of source VM and click ‘Next’
a.
Source
Location – East Asia (as stated earlier)
b.
Azure
Virtual machine deployment model – leave that as default Resource Manager
c.
Source
Subscription – [Your Subscription Name]
d.
Source
resource group – [Your Resource Group]
e.
Disaster Recovery
between Availability Zones – leave it as ‘No’


5. At the ‘Replication settings’ page, verify the details and click ‘Enable Replication’

6. Follow the progress under Notifications and move on to next section


Before running test failover, check if VM is protected and
healthy. Make sure, you select an Azure virtual network in target region when
you run a test failover. Azure VM created after the failover will be placed in
this network.
1.
Click on the VM which opens a page that looks
something similar to below one. On the Overview page, you get various option like
Failover, Test failover, Disable replication etc.

2.
Click on Test Failover and choose a recovery
point. In Azure Virtual network, select
target network in which to place Azure VM created after the failover and click
OK to start the failover.

3.
Follow the progress under Notifications and move on to next section

4.
After the failover completes, Azure VM created
in Target region. Make sure that VM is running, sized appropriately and
connected to the network selected.
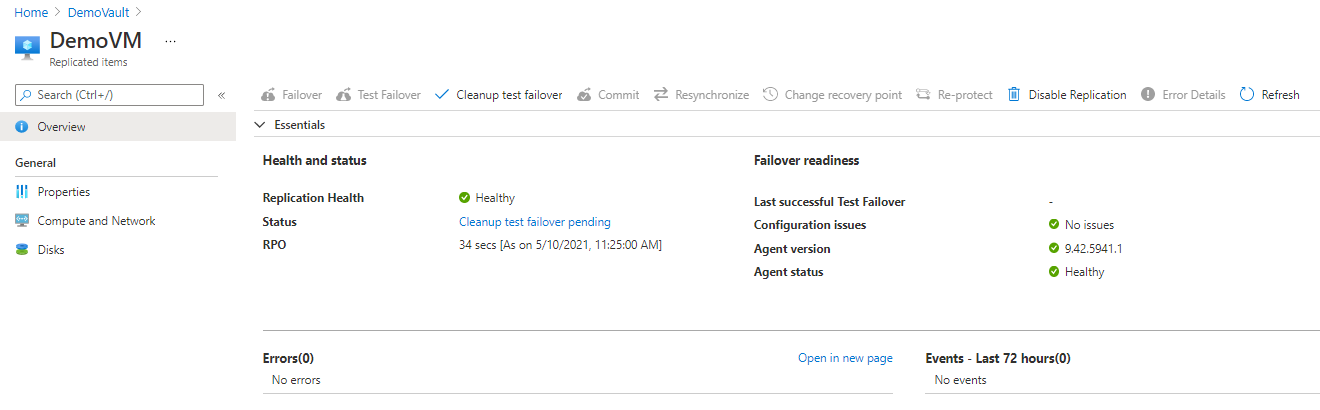
5.
Upon the completion of test failover, clean up
the resources using ‘Cleanup Test Failover’ button as shown in above screenshot

6.
Follow the progress under Notifications and move on to next section

Failover, Commit & Re-protect:
1.
Upon the completion of Test failover and cleanup,
select ‘Failover’ on the overview
page.

2.
Choose a ‘recovery
point’ and click on the checkbox ‘Shut
Down machine before beginning failover’ and select OK to start the
failover.

3. Follow the progress under Notifications and move on to next section

Failover completed status is
displayed on below screen.

4.
Upon failover, VM is created in target region
appears in Virtual machines.

Please note, if you would like to delete all the available recovery points of the VM
in Site recovery, use Commit option as shown in below screenshot.
If you commit, you won’t
be able to change the recovery point.
5.
Click on Commit
to delete all recovery points

6. Click Ok to confirm.

7. Follow the progress under Notifications and move on to next section

Re-Protect
After failover, Re-protect is used to replicate back to
primary region.
8.
Once Commit
is completed, you can re-protect VM using the option shown in below screenshot.

9. In Re-protect page, verify the replication target details and its direction.

10.
Follow the progress under Notifications and move on to next section


References:
https://docs.microsoft.com/en-us/azure/site-recovery/azure-to-azure-tutorial-enable-replication
https://docs.microsoft.com/en-us/azure/site-recovery/azure-to-azure-tutorial-dr-drill
https://docs.microsoft.com/en-us/azure/site-recovery/azure-to-azure-tutorial-failover-failback
Comments
Post a Comment